All examples discussed are applicable to every flavor of NativeScript (Angular, React, Solid, Svelte and Vue). Where view markup examples are shown, Angular syntax may be shown but you can apply any sample to any flavor with it's syntactical rules.
What layout to even start with?
With currently 7 total possible layout containers ( StackLayout, GridLayout, RootLayout, FlexboxLayout, WrapLayout, DockLayout, AbsoluteLayout ), where to even start laying out your first page design?
Keep it dead simple - GridLayout and StackLayout by default.
You can get through a full set of complex designs almost entirely with Grid and Stack. GridLayout is my personal default container when starting any design layout but StackLayout is equally as useful when needing a simple vertical stack of things. Both are performant.
What even is a GridLayout or StackLayout?
They are singular JavaScript primitives which represent the best of class performance possible on the platform they are run on.
On iOS, it's a natural UIView which is created right here in TypeScript whereby GridLayout adds row/column measurement abilities on top of CustomLayoutView by extending it here.
On Android, it's a natural android.view.ViewGroup which is created right here in TypeScript which uses some extra core helpers for convenience managed here.
GridLayout is extremely versatile. It can be used as table layouts, overall page structure where sections auto-flex to fit diverse screen widths and can even be used in cases where you may think to reach for AbsoluteLayout but in fact will do a better job plus easier to manage.
<GridLayout>
  <Image/> // animate translate: { x: 0, y: 0 } > { x: 100, y: 100 }
  <Image/> // animate translate: { x: 100, y: 100 } > { x: 0, y: 0 }
  <Image/> // animate translate: { x: 50, y: 50 } > { x: 100, y: 100 }
</GridLayout>
You can have any number of components inside GridLayouts. In this example, each Image is like a Photoshop layer (components at bottom overlap components higher up) in this context where each could have various levels of opacity and they would composite/animate over each other. You can do pretty impressive compositing animation tricks with free floating components inside a wide open GridLayout (with no rows or columns at all) spanning the entire screen. Same kind of stuff you would think to do with absolute positioning on the web.
The majority of the layouts seen here are GridLayouts with the compositing animations using this approach:
Note on RootLayout
RootLayout is intended to only be used once, hence it's name, as the root layout container for the entire app. This is by design since @nativescript/core holds an app-wide reference to it's container you can access from anywhere to use it's features (largely to easily open screens dynamically from anywhere over the main layout). RootLayout is just a GridLayout with extra APIs. It's best used as the root layout container for the entire app, usually the root view the app is booted with. It's not mandatory and only needed if you plan to use it's API. It won't hurt an app in anyway so sometimes it's a good default setup to use one as your root app layout container because it's API will be at your disposal anytime...just in case.
Surprising WrapLayout
Not that it's often needed or used a lot but the often surprisingly helpful layout is WrapLayout. It's kind of incredible what you can do with WrapLayout. For example, you can even mimic flow layout (web div style layout) having hundreds of Label's inside a WrapLayout where they would naturally wrap to next line when they reach available width (each styled per data bindings in the collection it's iterating through). You can also achieve naturally wrapping column setups inside a WrapLayout whereby it would be a single column at a certain narrow width (like portrait style) and when wider (landscape), it would naturally turn into 2 columns wrapping additional components inside to next row, etc.
Here's an example:
<WrapLayout orientation="horizontal" class="px-4 pb-8">
  @for (item of list; track $index) {
  <GridLayout
    class="mr-2 mt-4 rounded-xl border border-black"
    [width]="portrait ? '100%' : '46%'"
  >
    <!-- any component -->
  </GridLayout>
  }
</WrapLayout>- Portait with each row taking full width and auto wrapping to stack vertically

- Landscape auto converting to 2 columns and auto wrapping each item in the list

Conclusion on layout
When in doubt, go with a Grid or Stack absolutely. All layouts can be useful in different circumstances so feel free to experiment however FlexboxLayout is actually the worst performing layout which is why I personally never use it. GridLayout can achieve the same layout setups one is often trying to do with Flex.
Gain control of TypeScript
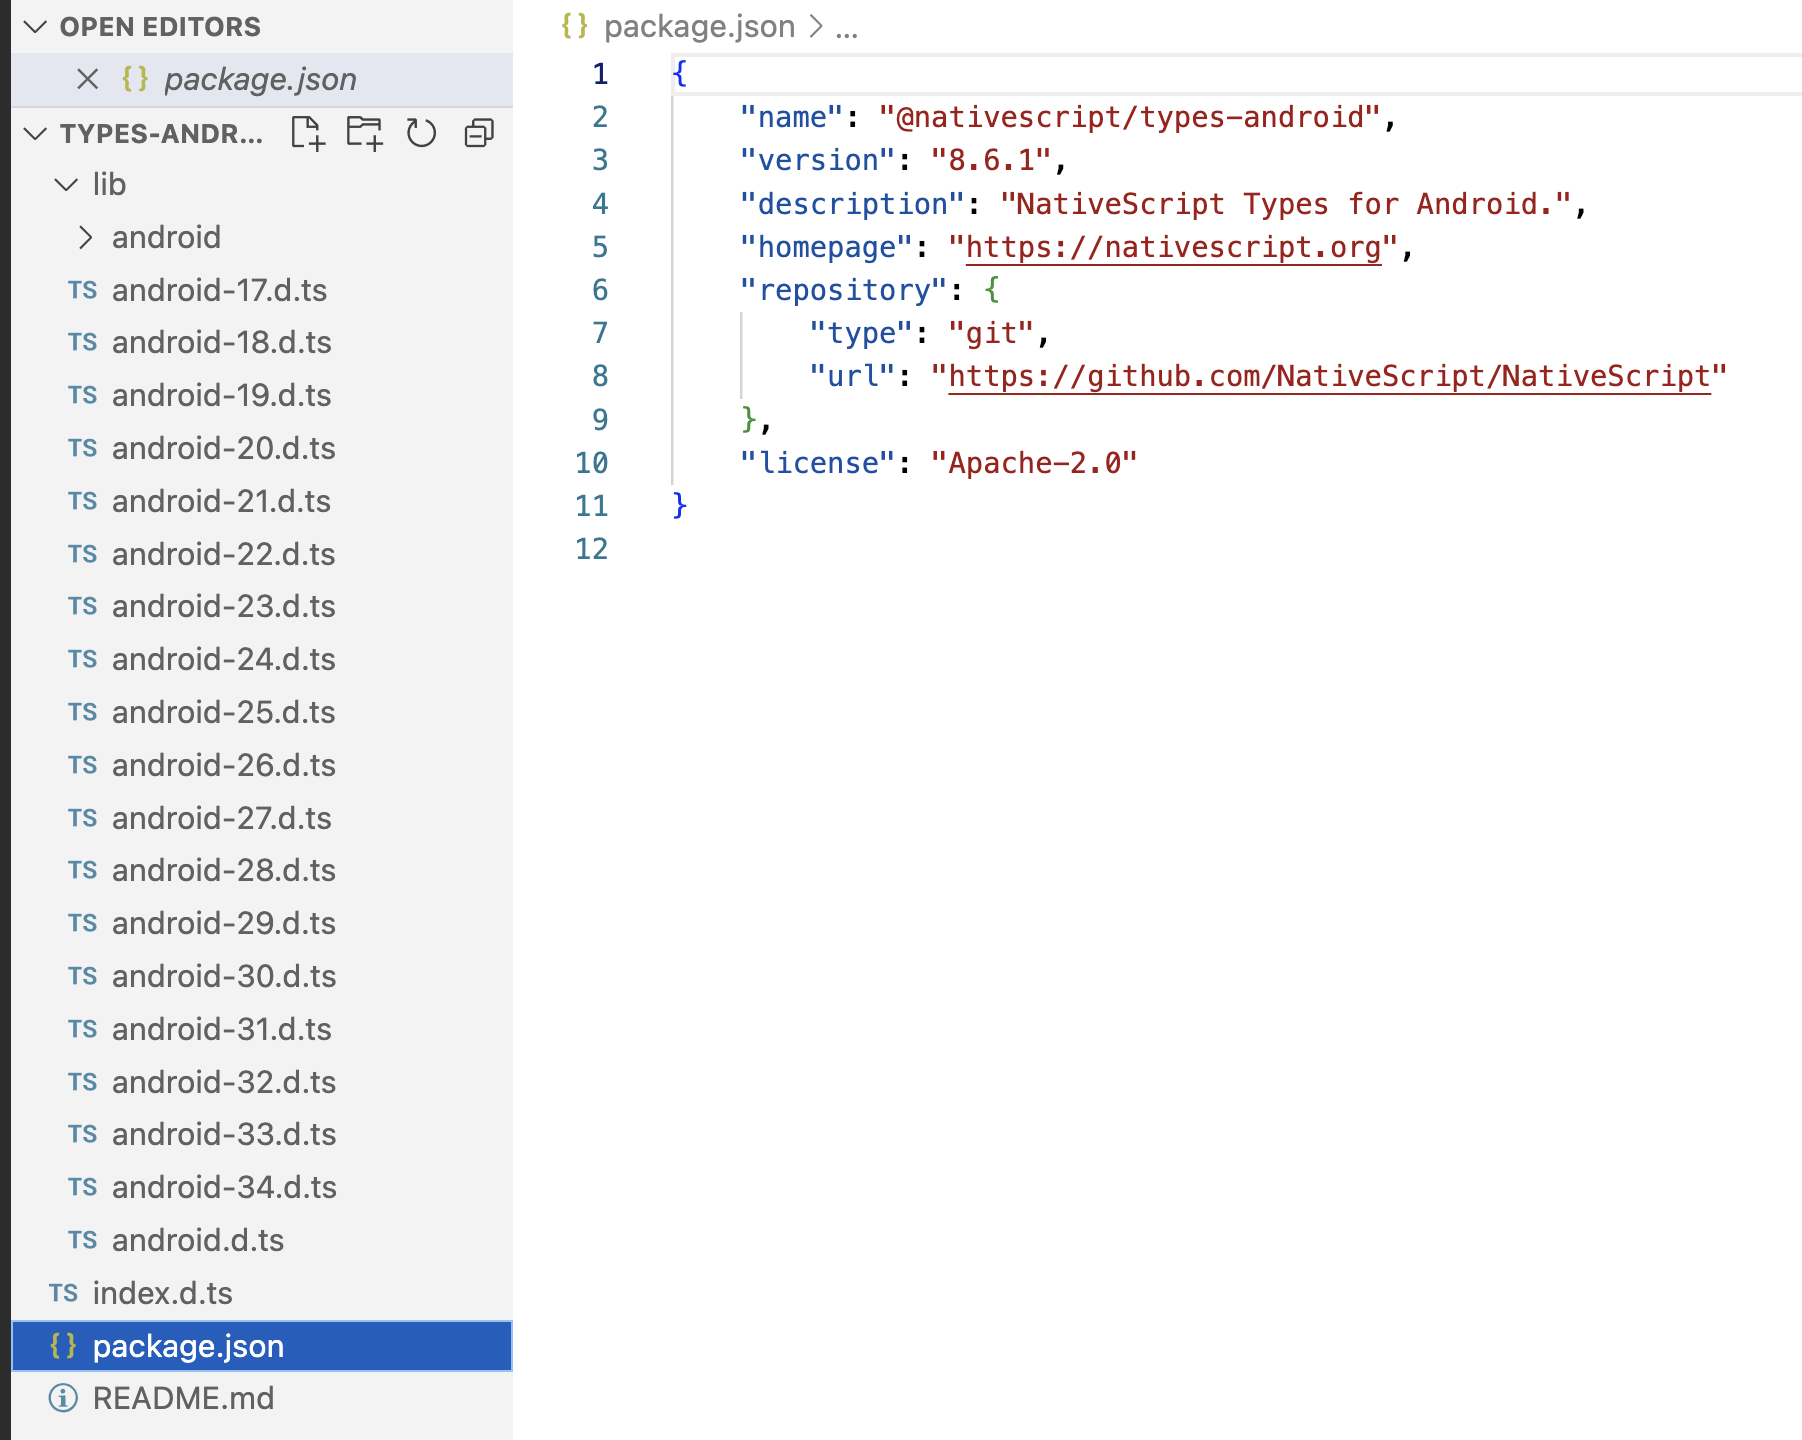
Each NativeScript project can bring along @nativescript/types which is just a singular package with nothing in it other than references to @nativescript/types-ios (the full iOS SDK platform types) and @nativescript/types-android (the full Android SDK platform types with a default API Level) but wait aren't those absolutely enormous?
Yes. That's why we only reference the most commonly used types by default in @nativescript/types so most projects will have a references.d.ts file which contains this line:
/// <reference path="./node_modules/@nativescript/types/index.d.ts" />That's just a convenience to get started. If you follow those types in your editor you'll see it includes only a subset of the iOS and Android platform SDKs. More importantly for Android it includes API Level 31 by default (at the time of this writing) however @nativescript/types-android includes API Level 17 all the way up to 34!

@nativescript/types provides a happy medium that you can adjust anytime. In all professional projects, we customize references.d.ts to include the types we need to work with to not only optimize our code editor but to also be specific about the SDK types we need in the project.
You can learn more about this here.
Show html content anywhere in your layout?
There's a lot of html content out there. Your backend API may return html fragments for display or you may even want to mix HTML content into your platform layouts wherever you'd like. There's a lot of options to do so including:
- @nativescript/core WebView: https://docs.nativescript.org/ui-and-styling.html#webview
- react-native-webview: https://twitter.com/ammarahm_ed/status/1741449871612121281
- Portals: https://github.com/NativeScript/ui-kit/blob/main/packages/ionic-portals/README.md
- WebViewExt: https://github.com/Notalib/nativescript-webview-ext
- Community ui-webview: https://github.com/nativescript-community/ui-webview
- Advanced webview: https://github.com/bradmartin/nativescript-advanced-webview
Depending on your needs, any of the above may be a great choice. Portals are neat because they have a great pub/sub API built in for messaging, state restoration APIs as well as syncing APIs to a remote host! I gave a talk on them at IoniConf 2022.
Here's a very common case where you just want to put some HTML on screen seamlessly with no extra scrollbars which can fit precisely the height of the native platform layout the HTML is loaded into. Using @nativescript/core WebView, you can achieve this with some neat NativeScript:
<WebView [src]="htmlMarkup" (loaded)="loaded($event)" (loadFinished)="ready($event)" />With the following binding setup:
import { Color, WebView } from '@nativescript/core';

let htmlMarkup = `<html><head><meta name=\"viewport\" content=\"initial-scale=1.0\" /><style>* { font-family: Arial, Helvetica, sans-serif; }</style></head><body><p>Hello World</p></body></html>`;

function loaded(args) {
  adjustWebViewSettings(args.object as WebView);
}

function ready(args) {
  adjustWebViewHeight(args.object as WebView);
}

export function adjustWebViewSettings(webView: WebView) {
  if (webView) {
    if (webView.android) {
      const settings = (<android.webkit.WebView>webView.android).getSettings();
      settings.setDomStorageEnabled(true);
      settings.setBuiltInZoomControls(false);
      settings.setJavaScriptEnabled(true);
      webView.android.setBackgroundColor(new Color('#fff').android);
    } else {
      webView.ios.backgroundColor = new Color('#fff').ios;
    }
  }
}

export function adjustWebViewHeight(webView: WebView) {
  if (webView.ios) {
    (webView.ios as WKWebView).evaluateJavaScriptCompletionHandler('document.body.scrollHeight', (result, error) => {
      webView.height = Number(result);
    });
  } else {
    (webView.android as android.webkit.WebView).evaluateJavascript(
      'document.body.scrollHeight',
      new android.webkit.ValueCallback<string>({
        onReceiveValue: (result) => {
          webView.height = Number(result);
        },
      });
    );
  }
}
This will auto adjust the height of the WebView to fit exactly the height of the HTML content loaded into it for a seamless fit into your platform native layout containing it. You can even put a platform ScrollView around it alongside other platform views. Your users will never know.
The first class loaded event is your best friend
The loaded event is your best friend for any case where you want a view reference. The reason is because it's a first class lifecycle event with NativeScript view components that works with all flavors and gives you the reference right at the best time to do things with it (particular UX'y stuff).
This setup always looks a bit like this:
<GridLayout (loaded)="loaded($event)" />function loaded(args) {
const grid = args.object as GridLayout
}This is useful to animate views when they are created on screen to preparing views for animations to kicking off an entire sequence of events that bring the page to life.
There's a very important note here though that may catch you by surprise. The loaded event fires when the view is ready to be programmatically controlled AND when the app suspends and RESUMES! @nativescript/core has always had this behavior and I personally have gone back and forth on whether that behavior should stay. You often setup animations on loaded or other initialization logic which you don't want to re-setup when your app resumes...or maybe you do? And that is thine question 😊 Just keep this important note in mind!
UX timing conditions and setTimeout
UX is all about timing right? Is setTimeout a code smell? Depends on who you ask and certainly what you're doing.
It's important to realize that setTimeout in NativeScript is actually an NSTimer on iOS, defined here in core, and a android.os.Handler on Android, defined here.
For example, what are timers often used for on iOS? Well, animations of course!
So how are we going to sequence complex animated sequences in our NativeScript app? Often with setTimeout. The key detail is you want to maintain tight control of them at all times to avoid them running rogue as mentioned in Best Practices here. Just 1 rogue timer not shutdown (or worse, doubled up, by getting called twice when one is expected) when expected will absolutely wreak havoc in your app and can have devastating effects on user experience.
setTimeout for Rendering tricks?
The other incredibly useful thing about setTimeout is the ability to execute code on the next JavaScript tick. Ya' know that all so important JavaScript event loop and also well explained here which also touches on Node's process.nextTick.
Let's say we have a loaded event fire on a view reference and we want to set it's location to the bottom of the screen and then animate it up into view?
We need to set the translateY value on the view reference to first set it's location at the bottom of the screen and then invoke an animation API. But how would the animation know to start at a translateY value if the view hasn't even rendered there yet? Enter the "next tick".
- the wrong way:
function loadedPanel(args) {
  const panel = args.object as GridLayout
  panel.opacity = 0
  panel.translateY = Screen.mainScreen.heightDIPs
  panel.animate({
    translate: { x: 0, y: Screen.mainScreen.heightDIPs - 375 },
    opacity: 1,
    duration: 300,
    curve: CoreTypes.AnimationCurve.easeInOut,
  })
}
We are setting translateY = Screen.mainScreen.heightDIPs which should start at the bottom of the screen right? No, because in order for translateY to set on the view synchronously first, we need the event loop to finish before doing anything else. Because we invoked that all synchronously the animation begins at a moment where translateY is still at the location where the view was loaded, which is at the top of the screen.
- the correct way, using setTimeout to allow rendering to properly complete (and measure) before starting the animation:
function loadedPanel(args) {
  const panel = args.object as GridLayout
  panel.opacity = 0
  panel.translateY = Screen.mainScreen.heightDIPs
  panel.requestLayout()
  setTimeout(() => {
    panel.animate({
      translate: { x: 0, y: Screen.mainScreen.heightDIPs - 375 },
      opacity: 1,
      duration: 300,
      curve: CoreTypes.AnimationCurve.easeInOut,
    })
  })
}
Here we only animate in the next tick, after the translateY had been set with a layout pass completed on it to achieve smooth and correct behavior.
Infinite loading table view?
Just a Grid with a header at the top and an infinite loading CollectionView below it. If you want to sort by columns (ascending/descending), add a tap on the header Label's and have them reorder your items view binding on the CollectionView. The displayItems collection will need to use a paginated setup whereby a backend API would provide set's of 20, 30, 50, 100 or whichever you prefer and each time loadMoreItems fires would just fetch the next set and append to the displayItems.
<GridLayout rows="auto,*">
  <GridLayout columns="*,auto,auto" class="header">
    <label text="Name" class="font-bold"></label>
    <label col="1" text="Date" class="font-bold"></label>
    <label col="2" text="Status" class="font-bold"></label>
  </GridLayout>
  <CollectionView
    row="1"
    [items]="displayItems"
    [itemTemplateSelector]="templateSelector"
    (loadMoreItems)="loadMoreItems($event)"
    (loaded)="loaded($event)"
  >
    <ng-template cvTemplateKey="tableRow" let-item="item" let-index="index">
      <GridLayout columns="*,auto,auto">
        <label [text]="item?.name"></label>
        <label col="1" [text]="item?.date"></label>
        <label col="2" [text]="item?.status"></label>
      </GridLayout>
    </ng-template>
  </CollectionView>
</GridLayout>
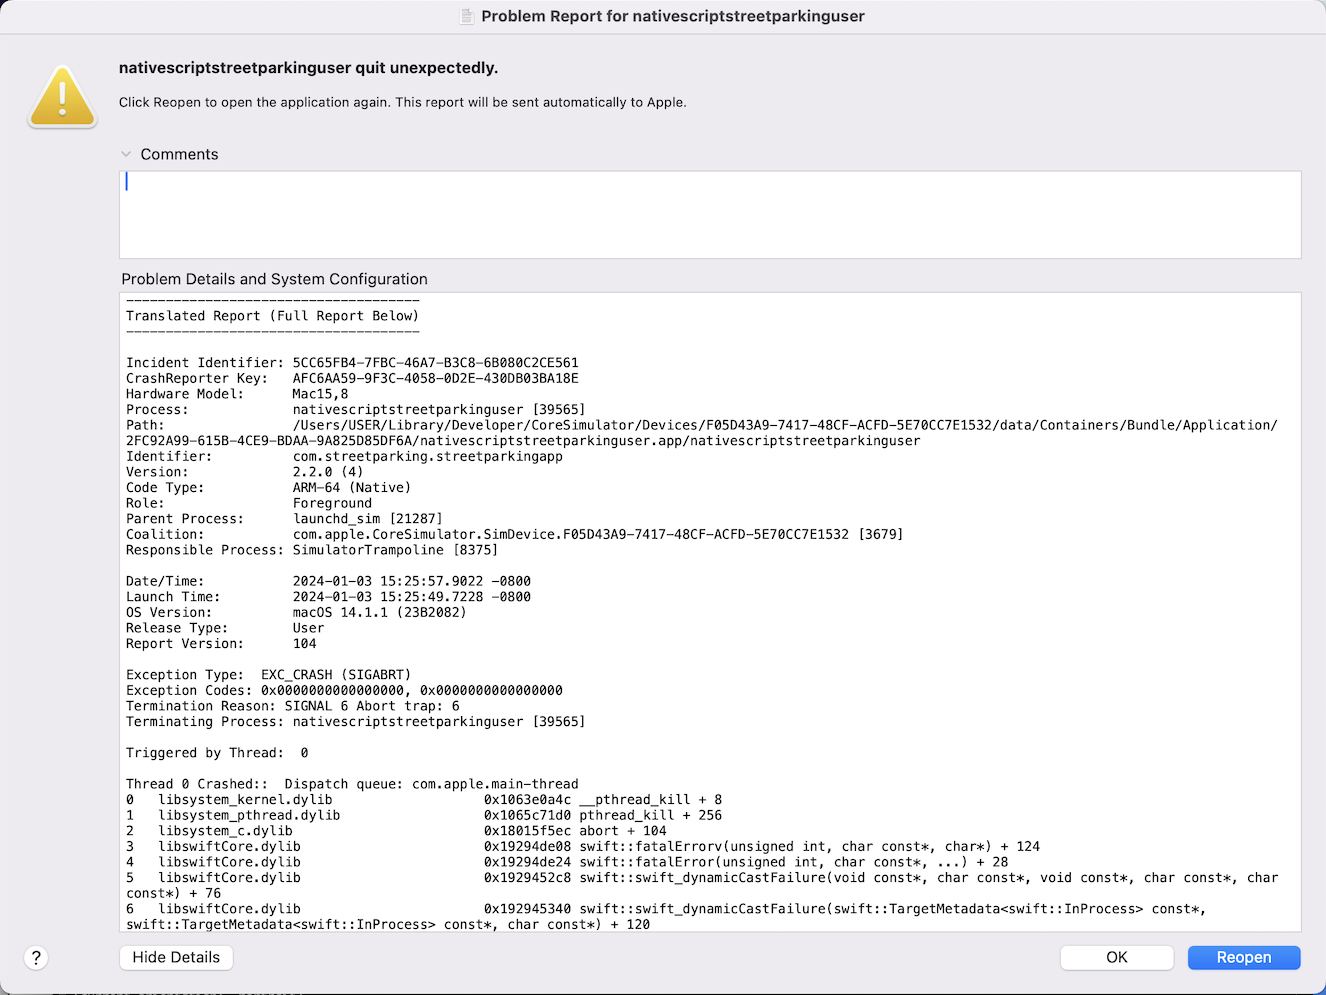
My app just crashed with hieroglyphics!@?
Sometimes when developing your app may crash and macOS will display a scary alert dialog like this:

The solution is often to invoke the following on the command line to open the Xcode project for your NativeScript app:
ns open ios
# This is a convenient CLI shortcut to:
# open platforms/iOS/{project}.xcodeproj
# or .xcworkspace depending on which you have
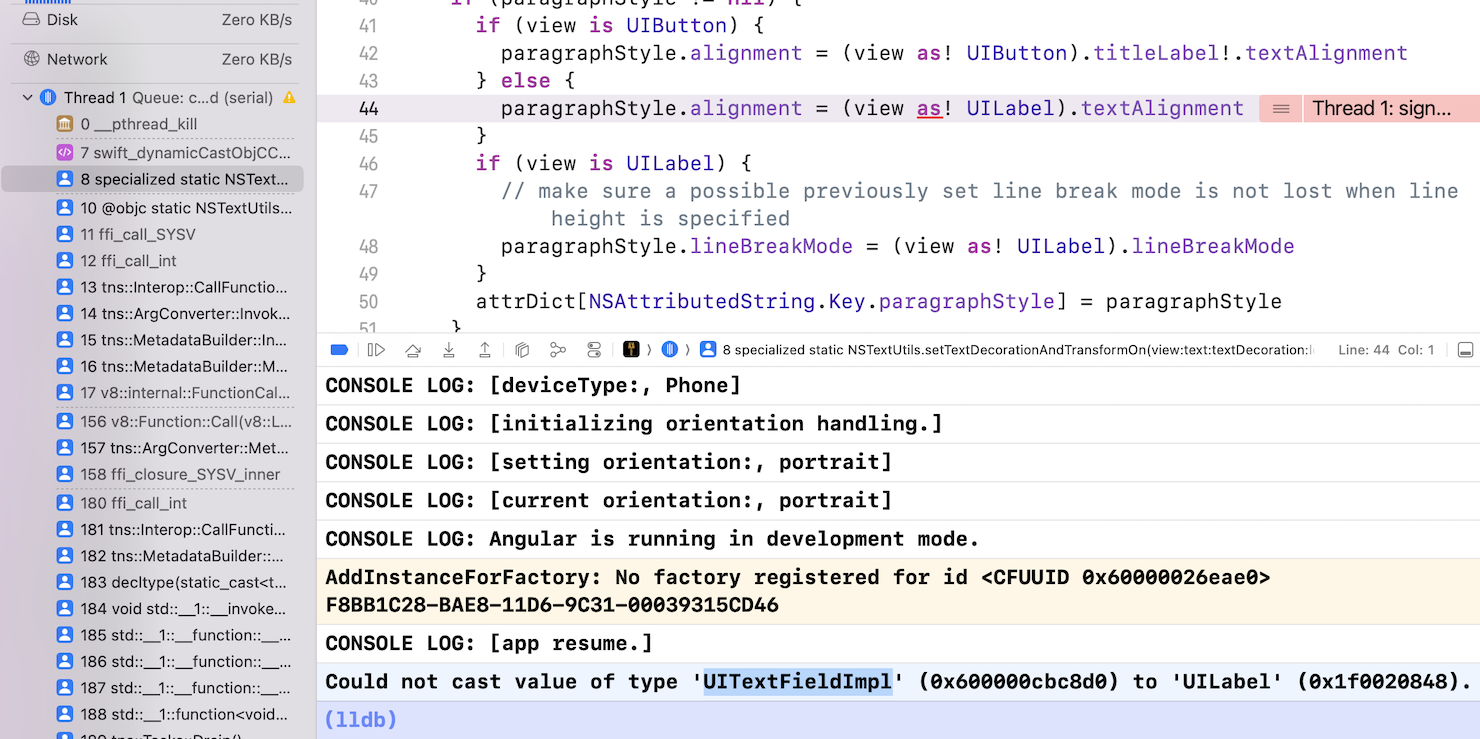
Run the project from Xcode and allow the error to occur there. You will often see the full stack with sometimes even the breakpoint debugger auto engaged allowing you to see exactly where it comes from. You can either npx patch-package a fix in, submit a PR to help resolve the issue to go forth and prosper.

Xcode etiquette
Whenever updating Xcode, it's a great time to clean DerivedData which Xcode uses to cache built libraries and other resources. It can be cleaned by opening Xcode > Settings > Location and you will see DerivedData mentioned with a location. You can tap the arrow to open in Finder and safely delete the entire DerivedData folder anytime. Xcode will regenerate it as needed on any app builds. Doing the occasional clean is always a good idea not just for overall system health, but good developer decorum too.
Sometimes inexplicable Xcode errors can lead back to just old DerivedData.
Benefits
One of the benefits of NativeScript is it's just natural platform development so the voluminous material out there which applies to natural platform development also applies to NativeScript.
It can be helpful to remember NativeScript is largely a transparent development enabler, allowing you as a JavaScript dev to do things never previously believed to be possible -- doing platform dev with JavaScript directly!. This means when encountering a problem, often the first instinct is correct -- just use the platform.
There's still an exciting variety of territory yet to be discovered with NativeScript's capabilities and what is even possible. Explore and have fun.
